2019. 5. 25. 14:42ㆍIT/C#
1. App Life Cycle
App은 앱 상태별로 메소드가 정의되어 있다. 상태가 변할때 어떤 동작을 하고 싶으면 app.xmal.cs 파일에 해당 코드를 기입하면 된다. 아래 메소드들은 이 파일에 이미 구현되어 있다.(내용 없는 빈 메서드로)
|
OnStart() : 앱 실행했을 때 실행됨. OnSleep() : 1. 다른 앱으로 전환되거나 바탕화면으로 가면 이게 실행됨. 2. 그리고 아예 앱을 종료했을때도 호출됨. OnResume() : 다시 복귀했을 때 실행됨. |
보통 이 3가지 상태만 사용한다.
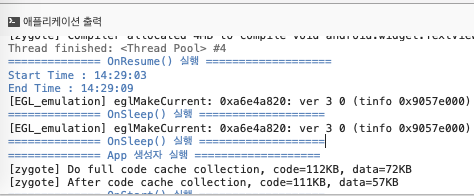
각각 어떤상황에 이 메소드들이 호출되는지 Debug.WriteLine() 으로 출력해보면 알수 있다. 아래 코드는 앱이 시작하고 종료될때의 시간을 출력해주는 간단한 앱이다. 환경변수를 이용하여 저장하였다.
using System;
using System.Diagnostics;
using Xamarin.Forms;
using Xamarin.Forms.Xaml;

namespace LoginTest
{
    public partial class App : Application
    {
        public App()
        {
            InitializeComponent();

            MainPage = new MainPage();
            Debug.WriteLine("============== App 생성자 실행 ===================");
        }

        protected override void OnStart()
        {
            // Handle when your app starts
            Debug.WriteLine("============== OnStart() 실행 ===================");

            // 시작 시간 기록
            Application.Current.Properties["startTime"] = DateTime.Now.ToString("HH:mm:ss");
        }

        protected override void OnSleep()
        {
            // Handle when your app sleeps
            Debug.WriteLine("============== OnSleep() 실행 ===================");

            //종료시간 기록
            Application.Current.Properties["endTime"] = DateTime.Now.ToString("HH:mm:ss");
        }

        protected override void OnResume()
        {
            // Handle when your app resumes
            Debug.WriteLine("============== OnResume() 실행 ===================");

            if (Application.Current.Properties.ContainsKey("startTime") && Application.Current.Properties.ContainsKey("endTime"))
            {
                Debug.WriteLine($"Start Time : {Application.Current.Properties["startTime"]}");
                Debug.WriteLine($"End Time : {Application.Current.Properties["endTime"]}");
            }
        }
    }
}

2. 환경변수 사용하기
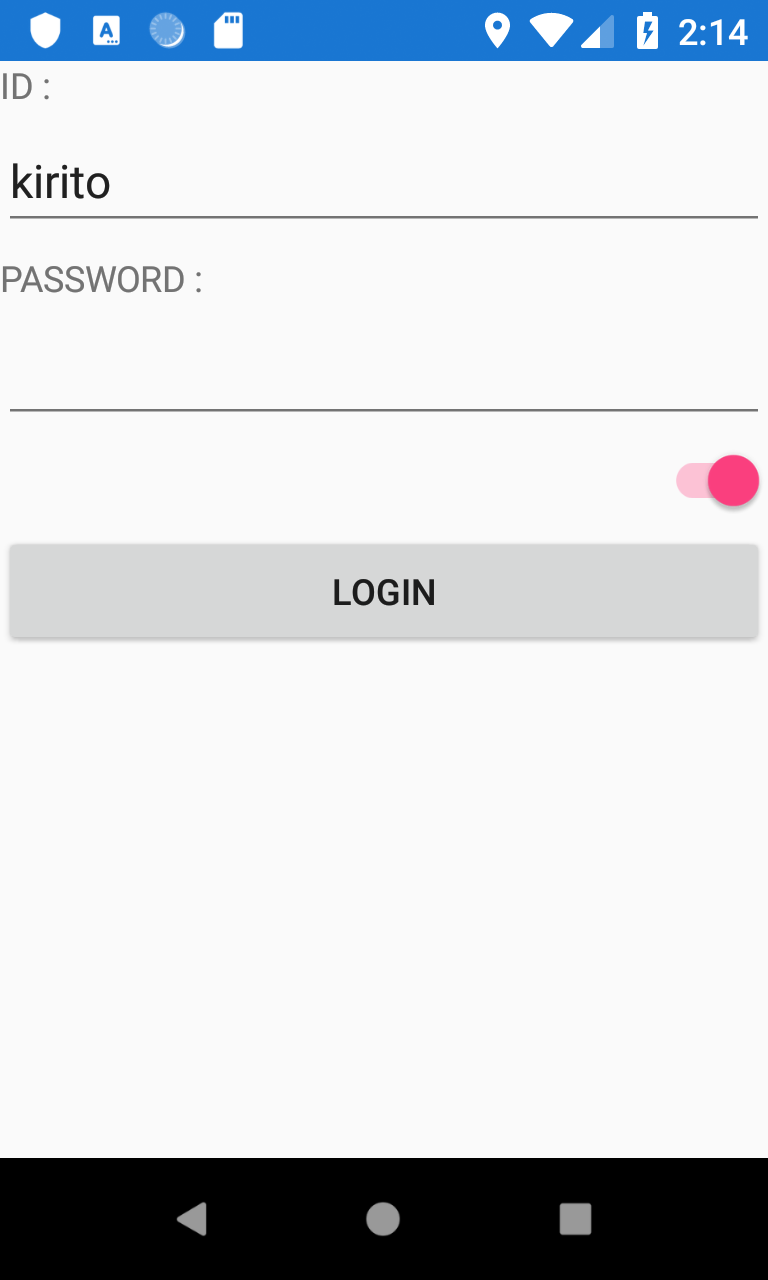
환경변수는 앱과 별도의 공간에 변수를 저장하거나 읽어 올수 있다. 마치 윈도우 레지스트리랑 비슷하다고 생각하면 이해가 쉬울것이다. 보통 로그인 id 기억하기 같은 기능을 구현할때 사용한다. 그럼 간단히 로그인 화면을 구현하여 학습해보자. 내용은 주석 참고.
<?xml version="1.0" encoding="utf-8"?>
<ContentPage xmlns="http://xamarin.com/schemas/2014/forms" xmlns:x="http://schemas.microsoft.com/winfx/2009/xaml" xmlns:local="clr-namespace:LoginTest" x:Class="LoginTest.MainPage">
    <StackLayout>
        <!-- Place new controls here -->
        <StackLayout Orientation="Vertical">
            <Label Text="ID : " />
            <Entry x:Name="entId" MaxLength="20" />
         </StackLayout>
        <StackLayout Orientation="Vertical">
            <Label Text="PASSWORD : " />
            <Entry x:Name="entPasswd" MaxLength="20" />
         </StackLayout>
        <Switch x:Name="swId" IsToggled="false" />
        <Button x:Name="btnLogin" Text="LOGIN" />
    </StackLayout>
</ContentPage>
using System;
using System.Collections.Generic;
using System.ComponentModel;
using System.Linq;
using System.Text;
using System.Threading.Tasks;
using Xamarin.Forms;
namespace LoginTest
{
// Learn more about making custom code visible in the Xamarin.Forms previewer
// by visiting https://aka.ms/xamarinforms-previewer
[DesignTimeVisible(true)]
public partial class MainPage : ContentPage
{
public MainPage()
{
InitializeComponent();
// 화면이 나타날때
this.Appearing += (sender, e) =>
{
// 환경변수에 id란게 있는지 확인하고
if (Application.Current.Properties.ContainsKey("id"))
{
// id가 공란이 아니면 ID entry에 값을 넣어주고 토글 스위치를 활성화 한다. 값이 공란이면 토글 스위치는 비활성화 한다.
if (Application.Current.Properties["id"] as string != string.Empty)
{
this.entId.Text = Application.Current.Properties["id"] as string;
this.swId.IsToggled = true;
}
else
{
this.swId.IsToggled = false;
}
}
};
// 로그인 버튼이 클릭 될때
this.btnLogin.Clicked += (sender, e) =>
{
// ID entry이가 비어 있거나 토글이 활성화 되어 있으면 환경변수에 저장하고 아니면 환경변수에 공란을 저장하라
if(this.entId.Text != string.Empty && this.swId.IsToggled == true)
{
Application.Current.Properties["id"] = this.entId.Text;
}
else
{
Application.Current.Properties["id"] = string.Empty;
}
};
}
}
}


3. Label한개에서 문자마다 다른 스타일 적용하기
지금까지는 Label 한개당 한개의 스타일을 적용할 수 밖에 없었다. 가령 ID(아이디) 라고 있으면 전체 스타일이 들어가야 됐었다. 하지만 아래의 코드를 이용하면 각각의 문자마다 스타일을 따로 적용하는것이 가능하다.
<?xml version="1.0" encoding="utf-8"?>
<ContentPage xmlns="http://xamarin.com/schemas/2014/forms" xmlns:x="http://schemas.microsoft.com/winfx/2009/xaml" xmlns:local="clr-namespace:LoginTest" x:Class="LoginTest.MainPage">
    <StackLayout>
        <!-- Place new controls here -->
        <StackLayout Orientation="Vertical">
            <Label>
                <Label.FormattedText>
                    <FormattedString>
                        <Span Text="ID" />
                        <Span Text="(아이디)" ForegroundColor="Red" FontAttributes="Bold" FontSize="20" />
                    </FormattedString>
                </Label.FormattedText>
            </Label>
            <Entry x:Name="entId" MaxLength="20" />
         </StackLayout>
        <StackLayout Orientation="Vertical">
            <Label Text="PASSWORD : " />
            <Entry x:Name="entPasswd" MaxLength="20" />
         </StackLayout>
        <Switch x:Name="swId" IsToggled="false" />
        <Button x:Name="btnLogin" Text="LOGIN" />
    </StackLayout>
</ContentPage>
4.Xml 특수문자
< <
> >
& &
' ‘
" “
5. XAML에서 생성자, Static 메서드 사용하기
XAML에서도 생성자, Static 메서드를 사용할 수 있다. 아래 Password Lable과 Nick name Label에 각각 생성자와 메서드 사용방법에 대해서 코멘트를 달아놓았다.
<?xml version="1.0" encoding="utf-8"?>
<ContentPage xmlns="http://xamarin.com/schemas/2014/forms" xmlns:x="http://schemas.microsoft.com/winfx/2009/xaml" xmlns:local="clr-namespace:LoginTest" x:Class="LoginTest.MainPage">
    <StackLayout>
        <!-- Place new controls here -->
        <StackLayout Orientation="Vertical">
            <Label>
                <Label.FormattedText>
                    <FormattedString>
                        <Span Text="ID" />
                        <Span Text="(아이디)" ForegroundColor="Red" FontAttributes="Bold" FontSize="20" />
                    </FormattedString>
                </Label.FormattedText>
            </Label>
            <Entry x:Name="entId" MaxLength="20" />
         </StackLayout>
        <StackLayout Orientation="Vertical">
            <Label Text="PASSWORD : ">
                <Label.TextColor>
                    <!-- Color 생성자를 이용하는 방법 -->
                    <Color>
                        <x:Arguments>
                            <x:Double>0</x:Double>      <!-- R 빨강 -->
                            <x:Double>255</x:Double>    <!-- G 녹색 -->
                            <x:Double>0</x:Double>      <!-- B 파랑 -->
                            <x:Double>128</x:Double>    <!-- A 투명 -->
                        </x:Arguments>
                    </Color>
                </Label.TextColor>
            </Label>
            <Entry x:Name="entPasswd" MaxLength="20" />
         </StackLayout>
        <Switch x:Name="swId" IsToggled="false" />
        <Button x:Name="btnLogin" Text="LOGIN" />

        <!-- Color 메서드를 이용하는 방법(Static 메서드만 이용가능) -->
        <Label Text="Nick Name">
            <Label.TextColor>
                <Color x:FactoryMethod="FromRgba">
                    <x:Arguments>
                        <x:Int32>0</x:Int32>      <!-- R 빨강 -->
                        <x:Int32>0</x:Int32>    <!-- G 녹색 -->
                        <x:Int32>255</x:Int32>      <!-- B 파랑 -->
                        <x:Int32>128</x:Int32>    <!-- A 투명 -->
                    </x:Arguments>
                </Color>
            </Label.TextColor>
        </Label>
    </StackLayout>
</ContentPage>
'IT > C#' 카테고리의 다른 글
| [XAMARIN] Iconpack (0) | 2019.06.15 |
|---|---|
| [XAMARIN] Entry, Editor, SearchBar DatePicker, TimePicker 사용 예제 (0) | 2019.06.08 |
| [XAMARIN] Resource Dictionary 사용하기 (0) | 2019.06.02 |
| [XAMARIN] ContentView 만들기와 Tapped 이벤트 처리 (0) | 2019.05.29 |
| [XAMARIN] Button 이벤트 (0) | 2019.05.25 |
| [XAMARIN] 가변길이 문자열 화면에 표현하기 (0) | 2019.05.23 |
| [XAMARIN] 멀티뷰 - StatckLayout (0) | 2019.05.20 |
| [XAMARIN] Label 사용방법 (0) | 2019.05.19 |

